
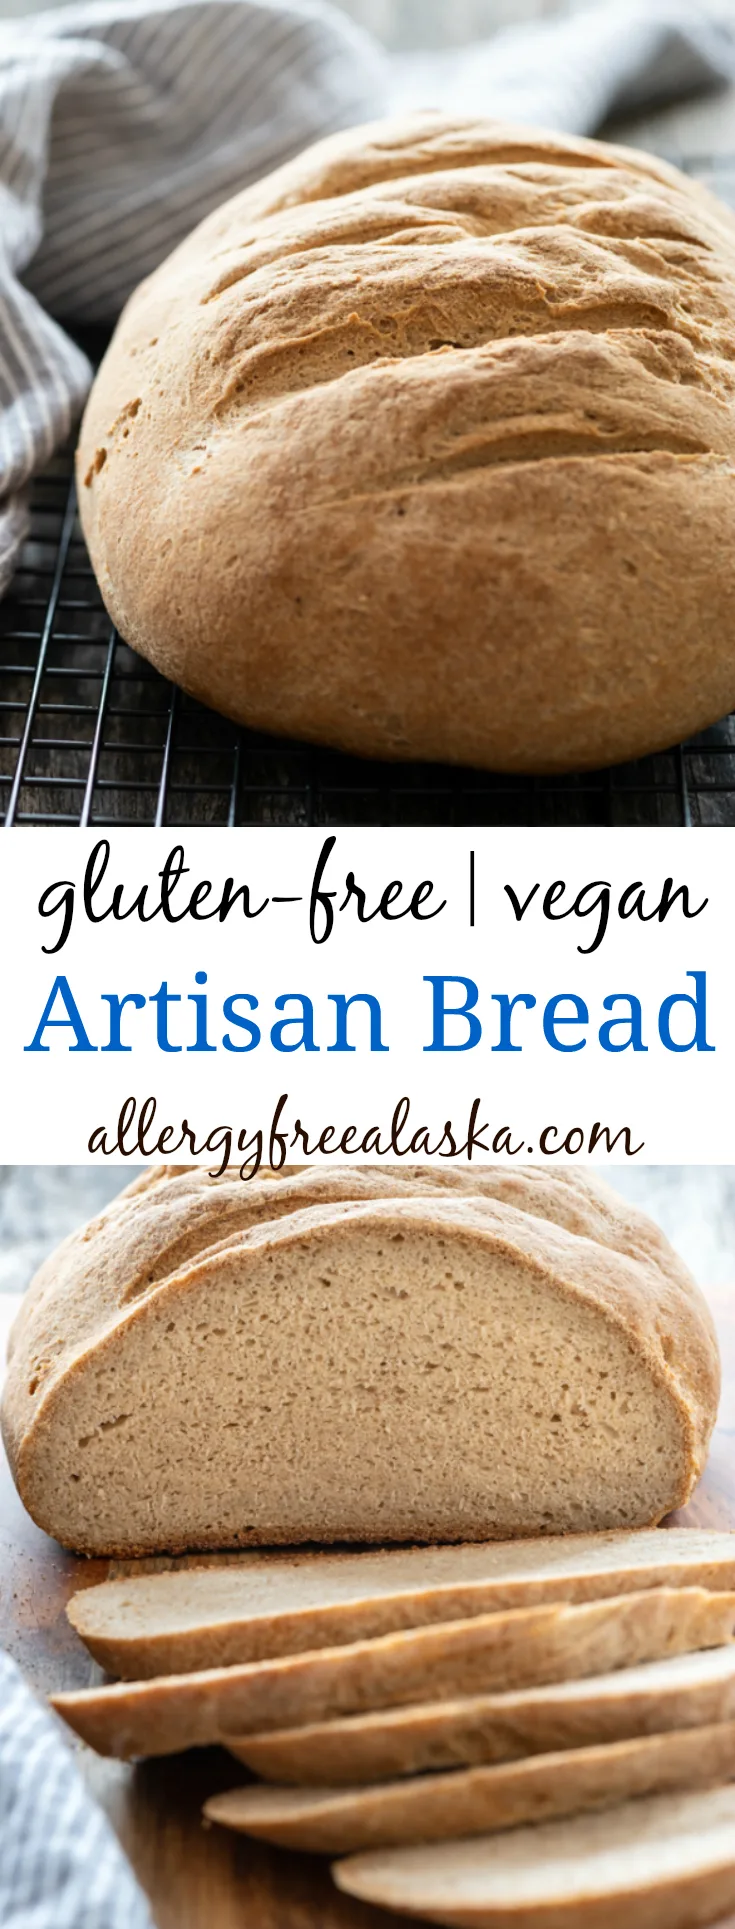
If you’re searching for that perfect bakery loaf, look no further than this Gluten-Free Bread. The recipe produces a beautiful artisan gluten-free bread loaf that can be baked with a crusty or soft exterior. Cut into it and you will reveal tender, slightly chewy bread with a wonderfully tight crumb. It has the delightful weightiness of a rustic round loaf. You won’t believe it’s not only gluten-free, but also vegan, nut-free, gum-free, and nightshade-free (no corn or potato).

This allergy-friendly bread begs to be sliced and slathered with your favorite spread, like hummus, homemade jam, or soft dairy-free cheese. But it’s also great all-around bread for sandwiches, crostini, French toast, bread pudding, stuffing, or croutons.
The Secret to Free-Form Gluten-Free Bread
Gluten-free egg-free bread is typically made with a thick batter, not firm dough, to ensure there is enough moisture in the finished loaf. The proteins in gluten-free flours and starches don’t tend to be as elastic as gluten, which makes for a looser mixture. If you add more gluten-free flour in an attempt to thicken it, then the end result will be very dry.

So how do you create workable gluten-free bread dough? In this recipe, I use powdered psyllium husk. Psyllium husk powder helps to retain moisture during baking and it provides more elasticity to the dough so that it can maintain its shape. The dough is a little stickier than gluten-containing bread dough, but it can still be easily formed into a gluten-free boule that will hold its structure in the oven. As it bakes, the dough gently rises and doesn’t spread.

Wheat-Free Bread Ingredient Tips and Substitutions
Gluten-free vegan bread baking is truly a science. I recommend sticking to the recipe precisely for foolproof results. But I realize that you might not be familiar with some of the ingredients, or that you might need to make a substitution. Here are some helpful notes along with guidance for possible substitutions.
Millet Flour, Brown Rice Flour, Sorghum Flour & Tapioca Starch
I’ve created this flour and starch blend for optimal results in this gluten-free vegan bread recipe, so I don’t recommend substituting a store-bought flour blend. If you must substitute one of the flours with another gluten-free flour, stick with lighter grain flours.
Avoid almond flour, seed flour, and coconut flour in this recipe, because they will set the moisture balance off. Heavier gluten-free flours, like teff or buckwheat, can also be tricky. If you want to incorporate these types of flour, I recommend trying the Artisan Multigrain Boule recipe in my ebook, Gluten-Free Baking from Scratch.

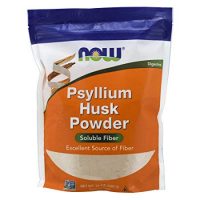
Psyllium Husk Powder
A key to making this vegan bread is using psyllium husks. Psyllium husks are often sold as a fiber supplement, but you want to use the powder variety specifically for baking. Whole psyllium husks will not absorb as much liquid or provide as much structure as the powdered version. If you can’t find psyllium husk powder, you can buy the whole psyllium husks (usually sold in the dietary supplement aisle) and grind them into a powder. Pour the husks into a clean blender or coffee grinder and blend until powdered, about 30 seconds. Measure the amount you need after it’s powdered.
But keep in mind that not all psyllium husk products are created equal. Some cast a purplish hue on the finished baked good, and some don’t absorb moisture as well. If the color of your bread looks off, or the dough spreads too much when baking, it could be the brand of psyllium husks that you used. I use Now Foods Psyllium Husk Powder for the best binding power and the most seamless results in this vegan bread recipe.

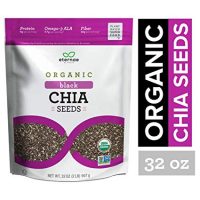
Ground Chia Seed
If you can’t locate pre-ground chia seed, or chia seed meal, you can grind whole chia seeds yourself. Simply place them in a clean blender or coffee grinder and blend until powdered, about 30 seconds.
You can substitute ground flaxseed if needed, but chia seeds offer a little more moisture and binding, without the nutty flavor.
Organic Cane Sugar
I recommend organic cane sugar because it’s suitable for strictly vegan diets, but you can substitute non-organic sugar. If you opt to substitute another type of granulated sugar, like coconut sugar, it will lightly affect the flavor and browning of this wheat-free bread.
Instant Yeast
This is not the same as active dry yeast, which requires proofing in warm water. Instant yeast can be mixed directly into the dry ingredients, and it consistently produces a better rise. I use the red label package of SAF instant yeast.
If you can’t find instant yeast, you can substitute active dry yeast, but you will need to proof it first. Pour the warm water and maple syrup in the recipe into a bowl. Sprinkle in the yeast, and let it sit for 5 minutes, until bubbly or foamy. Stir in the oil and continue with the recipe as written.

Olive Oil
I like the rich, savory flavor that olive oil provides to this vegan gluten-free bread, but you can substitute another type of oil if preferred. Vegan “butter” will also work, but I do not recommend using a fat substitute, like applesauce. The bread does need just a little fat for a tender crumb.
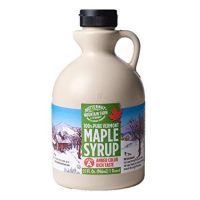
Maple Syrup
You can substitute another liquid sweetener, like agave nectar, coconut nectar, or honey (for non-vegan). I just prefer the warm, earthy flavor that maple imparts.

How to make Gluten-Free Bread:
- Using an electric mixer with the paddle attachment, combine the tapioca starch, millet flour, brown rice flour, sorghum flour, powdered psyllium husk, ground chia seed, organic cane sugar, and sea salt.
- Mix in the instant yeast.
- Add the olive oil, maple syrup, and warm water. Mix on low for about 15 seconds. Stop the mixer and scrape down the sides of the bowl. Continue mixing on medium-high for about 3 minutes.
- The dough will be sticky and shaggy in texture.
- Carefully remove the dough from the mixing bowl and onto a parchment lined baking sheet. Use your hands to form the dough into a round/oblong loaf (see pictures above for shaping example). Rise for an hour.
- Score the top of the loaf with a sharp kitchen knife or a razor blade.
- Bake using desired method below:
Artisan Gluten-Free Bread Baking Methods:
This loaf can be baked 3 different ways. The crust of the boule will be slightly crustier using the Pizza Stone/Cast Iron Pizza Pan or Dutch Oven methods.
Baking Sheet Method-
Preheat oven to 400 degrees (F). When the loaf is finished rising, bake for 40-50 minutes, or until the internal temperature of the loaf reaches over 202 degrees (F).
I will often make 2 gluten free bread loaves at once using a baking sheet that is 15x21” in size (if you do not currently own a baking sheet this size, make sure you measure the inside of your oven prior to buying one). The 2 loaves fit nicely on this size of baking sheet and still have room to expand without touching. If making 2 loaves, measure and mix each loaf independently. Your mixer will most likely not be able to handle making a double batch at one time.
Pizza Stone/Cast Iron Pizza Pan Method-
Place a pizza stone or cast iron pizza pan into a cold oven and preheat at 400 degrees for at least 30-40 minutes prior to baking the bread. When you are ready to bake, gently ease the loaf onto the preheated stone/pan using the parchment paper. When I use this method, I prefer to let my bread rise on an upside down baking sheet. This way I can slide the loaf right off onto the preheated stone/pan without any sides getting in the way. Just remember, the goal here is not to disturb the risen loaf as much. Bake 40-50 minutes, or until the internal temperature of the loaf reaches over 202 degrees (F).
Dutch Oven Method-
Place a 6-8 quart Dutch oven (with lid) in a cold oven and preheat at 450 degrees (F) for at least 30-40 minutes prior to baking the bread. When you are ready to bake, very carefully remove the Dutch oven from the oven and take off the lid (Caution, it will be HOT! I use a thick pair of oven mitts.). Gently pick up the sides of the parchment paper and lift the loaf, easing it gently into the bottom of the Dutch oven. The goal here is not to disturb the risen loaf much. Cover with the lid, and place in the oven to bake for 25 minutes. Remove the lid and continue to bake for an additional 10-15 minutes, or until the internal temperature of the loaf reaches 202 degrees (F). Some enameled Dutch ovens are heat-safe to only 400 degrees (F). Double check to see what yours is rated to prior to using it.

I hope you and your family enjoy this gf bread! You might also try my gluten-free rolls!
xoxo,
Mēgan
Gluten-Free Bread Recipe:

Artisan Gluten Free Bread
This Artisan Gluten-Free Bread recipe produces a beautiful bakery-style loaf anyone can make at home! Vegan, nut-free, gum-free & nightshade-free
Ingredients
- 1 cup tapioca starch
- 1 cup millet flour
- 1 cup brown rice flour
- 1 cup sorghum flour
- ¼ cup powdered psyllium husk
- 1 tablespoon ground chia seed
- 3 tablespoons organic cane sugar
- 1 ½ teaspoons sea salt
- 2 teaspoons instant yeast (I recommend red label SAF Instant Yeast)
- 2 tablespoons olive oil + more for oiling the bowl
- 1 tablespoon maple syrup (or honey for non-vegan)
- 2 ¼ cups warm water (between 100-105 degrees F)
Instructions
- Using an electric mixer with the paddle
attachment, combine the tapioca starch, millet flour, brown rice flour, sorghum flour, powdered psyllium husk, ground chia seed, organic cane sugar, and sea
salt. - Mix in the instant yeast.
- Add the olive oil, maple syrup, and warm water. Mix on low for about 15 seconds. Stop the mixer and scrape down the sides of the bowl. Continue mixing on medium-high for about 3 minutes.
- Use a spatula to group the dough together in a ball at the bottom of the mixing bowl. Pour about 2 teaspoons of additional olive oil on top of the dough. This will help you continue to form the round loaf, without the dough sticking to the spatula (or your hands).
- Carefully remove the dough from the mixing bowl and onto a parchment lined baking sheet. Use your hands to form the dough into a round/oblong loaf (see pictures above for shaping example).
- Cover with a clean kitchen towel and rise for 1 hour.
- Score the top of the loaf with a sharp kitchen knife or a razor blade.
- Bake using desired method below: Baking Methods:
This loaf can be baked 3 different ways. The crust of the boule will be slightly crustier using the Pizza Stone/Cast Iron Pizza Pan or Dutch Oven methods.
Baking Sheet Method-
Preheat oven to 400 degrees (F). When the loaf is finished rising, bake for 40-50 minutes, or until the internal temperature of the loaf reaches over 202 degrees (F).
I will often make 2 gluten free bread loaves at once using a baking sheet that is 15x21” in size (if you do not currently own a baking sheet this size, make sure you measure the inside of your oven prior to buying one).
The 2 loaves fit nicely on this size of baking sheet and still have room to expand without touching. If making 2 loaves, measure and mix each loaf independently. Your mixer will most likely not be able to handle making a double batch at one time.
Pizza Stone/Cast IronPizza Pan Method-
Place a pizza stone or cast iron pizza pan into a cold oven and preheat at 400 degrees for at least 30-40 minutes prior to baking the bread. When you are ready to bake, gently ease the loaf onto the preheated stone/pan using the parchment paper. When I use this method, I prefer to let my bread rise on an upside down baking sheet. This way I can slide the loaf right off
onto the preheated stone/pan without any sides getting in the way. Just remember, the goal here is not to disturb the risen loaf as much. Bake 40-50
minutes, or until the internal temperature of the loaf reaches over 202 degrees (F).
Dutch Oven Method-
Place a 6-8 quart Dutch oven (with lid) in a cold oven and preheat at 450 degrees (F) for at least 30-40 minutes prior to baking the bread. When you are ready to bake, very carefully remove the Dutch oven from
the oven and take off the lid (Caution, it will be HOT! I use a thick pair of oven mitts.). Gently pick up the sides of the parchment paper and lift the loaf, easing it gently into the bottom of the Dutch oven. The goal here is not to disturb the risen loaf much. Cover with the lid, and place in the oven to bake for 25 minutes. Remove the lid and continue to bake for an additional 10-15
minutes, or until the internal temperature of the loaf reaches 202 degrees (F). Some enameled Dutch ovens are heat-safe to only 400 degrees (F). Double check to see what yours is rated to prior to using it.
Recommended Products
We are a participant in the Amazon Services LLC Associates Program, an affiliate advertising program designed to provide a means for us to earn fees by linking to Amazon.com and affiliated sites.
-
 NOW Supplements, Psyllium Husk Powder, 24-Ounce
 -
 LeSaffre Saf-Instant Yeast, Red, 2 Pound
 -
 Eternae By Nature Organic Raw Chia Seeds, 32 Ounce
 -
 Butternut Mountain Farm, 100% Pure Maple Syrup From Vermont, Grade A, Amber Color, Rich Taste, All Natural, Easy Pour Jug, 32 Fl Oz, 1 Qt
 -
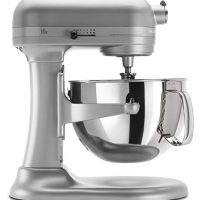 KitchenAid KP26M1XNP 6 Qt. Professional 600 Series Bowl-Lift Stand Mixer - Nickel Pearl
 -
 Reynolds Kitchens Non-Stick Parchment Paper - 60 Square Feet


We are a participant in the Amazon Services LLC Associates Program, an affiliate advertising program designed to provide a means for us to earn fees by linking to Amazon.com and affiliated sites.


Julie says
Looks so delicious! Is there a good sub for the brown rice flour? My little guy is intolerant but he would sure love some bread like this! Thanks!
Megan says
Hi Julie! I have a rice-free multigrain variation of this bread recipe in my e-book, Gluten-Free Baking From Scratch. Otherwise, when I was experimenting with this recipe, certain flour blends resulted in the inside of the bread being slightly wet (even when it was above 200 degrees F). If you didn't want to use the rice-free recipe in my e-book, and wanted to experiment with the above recipe instead, I'd try subbing another 1/2 cup of sorghum flour and 1/2 cup of millet to make up for the 1 cup of brown rice flour (I just can't guarantee your results). 🙂
Maria says
I eliminate the rice flour and increase the millet, sorghum and tapioca by 1/3 cup each and get excellent results!
Mēgan says
That's great, Maria! Thanks for sharing your subs with us!
Melissa says
Can you make the bread with a cuisinart hand mixer? I don’t have a standing mixer with a paddle attachment? Thanks.
Megan says
Hi Melissa,
This dough is fairly thick. I think if you attempted to use a hand mixer the dough would climb up the beaters and wouldn't work. I recommend a stand mixer because they are sturdier and overall built for thicker doughs.
Maryanne says
I have been using only a hand mixer. I mix for 1 minute less than the recipe calls for. For example, if the recipe says mix for 3 minutes, I mix for 2.
Mēgan says
And the dough doesn't climb the beaters?!
Angela Sommers says
This one speaks to me very loudly! 🙂 I just ordered the ingredients, and can't wait! I love, love, love European style bread and this look like the loaves I grew up on! So I'll report back once I make it, it just looks so delicious!
Megan says
Oh yay! Thank you. I think you'll love it, Angela, but please do come back and leave an honest review! 🙂 I can't wait to hear what you think!
Lori says
This looks amazing! Do you think I could make it in a bread maker?
Mēgan says
Hi Lori,
I’m not sure if this recipe will work in a bread maker, you might have to just try it! 🙂
Marion says
What brand of millet flour do you use? I have bought at least two different brands and have found it to be bitter.
Megan says
Hi Marion,
I most often use the Bob's Red Mill brand of millet flour, otherwise, sometimes I use Arrowhead Mills. I have noticed, sometimes I'll get a random bag that can be bitter, but I think that's because it's old (could be on the shelves of the store for a while). If you get a fresh bag of millet flour, it shouldn't be bitter. Definitely check out the expiration date before purchasing, just to be on the safe side!
Ashley says
I just made this bread yesterday--and it's delicious! I used to make dough from scratch for years before needing to shift to a gluten free diet ten months ago, and this was my first GF bread from scratch. I will definitely be making it again. It was really easy to assemble, it's quick to put together, and it smells and tastes like legitimate bread (for my kids that miss "gluten bread" this is a huge plus!). I used the dutch oven method (a favorite from making regular artisan bread in the past) and it was fabulous. If these are ingredients that work for you, it's definitely worth the wait ordering them and searching them out. I'm excited to have a go-to, quick recipe for fresh GF bread.
Megan says
Ashley, thank you so much for coming back here and commenting! I'm so very happy this was a success for you and your family!
Pamela says
Made the artisan bread today; very happy with how it turned out. How do you suggest storing the bread?
Megan says
Excellent! So glad to hear you are happy with it. Here in Alaska, I store our bread in a bread bag out on the counter for about 2 days before freezing the leftovers. However, if you live in a hot and humid climate, your bread may need to go into the freezer sooner. To freeze, I slice the entire loaf and place it in a freezer bag. To thaw I simply take out the pieces I need and pop them into the toaster. 🙂
Wendy says
I am starting to make my own GF products. I already have a food processor, but no stand mixer. Do you know If I can use the food processor to knead bread dough?
Thank you.
Megan says
Hi Wendy, I think the dough would burn out the motor in your food processor, because it's a thick dough, so I wouldn't recommend it.
Fathom says
I did it with a spoon.it was really easy to mix.
Terri says
Can anything be substituted for the psyllium husk? I'm not a fan of using psyllium husk. That is hard on your stomach.
Megan says
Hi Terri,
In this recipe, nothing can be substituted for the psyllium husk powder. The recipe was formulated especially for it. You might try my Gluten-Free Rice-Free Bread or my Gluten-Free Vegan Sandwich Bread instead - both of those use xanthan gum.
Molly says
Have you tried this in a bread maker?
Mēgan says
Hi Molly,
No, I haven't. I don't own one. 🙂
Ingrid says
I'm so interested in trying this! If I use Bob's Red Mill 1:1 GF Flour, any idea how much should I use in lieu of the tapioca starch and remaining GF flours?
Mēgan says
Hi Ingrid,
I don't recommend using the Bob's Red Mill 1 to 1 GF all-purpose flour in this recipe, for these reasons:
The 1 to 1 blend contains both xanthan gum and high amounts of sweet rice/rice flours. This bread recipe above uses psyllium husk powder to bind the flours together, not xanthan gum. High amounts of sweet rice/rice flours + more binding power from xanthan gum would equal a sticky, gummy mess. The recipe, as written above, is tried and true after many years of developing GF recipes. The flours called for in this recipe are used for specific purposes. Changing any of the ingredients that drastically would throw the recipe off. Sorry that it's probably not the news you wanted to hear! But I'd hate for you to waste that many ingredients.
Rose says
Yes omg I've been looking at your recipes for months. I'm a really young mom.. and I was really sick for a while, going gluten free saved my life. Not even exaggerating a little. I just made this bread and it came out great, my first real home made bread! And it's good I'm so proud of myself. I'm always going to refer to your recipes you're my internet mama. Dude, thankyou to the stars and back for your time and effort. I want to cry when I waist expensive baking stuff but nothing here was waisted! I actually used all sprouted flours and it worked fine. I'm super pleased!
Mēgan says
I'm so happy to hear that! Wonderful! 🙂
Susan Darling says
I am allergic to Chia (as well as flax and hemp seed) . Is there a substitute I can use in this recipe?
Mēgan says
Hi Susan, you might be able to omit it, but increase the psyllium husk powder by 1-2 teaspoons.
Barb says
I have made this bread several times and it is fantastic. Each time I learn something and it I hVE TRIED IT ON A COOKIE sheet, a pizza stone and now in a dutch oven.
I do have a question, have you tried making dinner rolls out of it?? I am going to try that next. Thanks for a great recipe!!
Mēgan says
Hi Barb, I haven't tried dinner rolls with this recipe in particular - I have with another similar one. The rolls ended up being heavy, almost too heavy. That said, it'd be fun to try that again with this recipe!
Becky says
Hi - If I wanted to use this as a hamburger bun (I was redirected from your post on GF hamburger buns since my hubby can't eat egg), can you recommend baking directions for smaller bun-size loafs?
Mēgan says
I would try 15-20 minutes at 375 degrees (F)? But that's just a guess!
Ann says
I make something very similar to this recipe into buns and I still keep the 400° F temperature. I just let them rise for about 20 min and bake them for close to 20 min,depending on the oven.
Claire Keating says
I'm looking forward to trying this delicious looking recipe. Can I use mixed brown and white rice flour in place of brown flour? Is tapioca starch the same as tapioca flour?
Mēgan says
Hi Claire,
Yes, I think a mix of brown rice flour and white rice flour would work well in lieu of just brown rice flour. Just don't use sweet white rice flour, as that might produce a gummy texture. Tapioca starch is the same as tapioca flour. 😉
Jess says
Hi Megan! This recipe is spectacular! I used to bake my own bread regularly (and so many other baked goods) but when my body made it apparent that I couldn't tolerate gluten any longer I stopped. I've missed good bread and haven't found any in the stores that is actually good and something I would want to eat. This recipe changed that completely! I've already made two loaves and intend to make many more. I will probably be getting your ebook soon so I can start really baking again. Thank you!!!
Mēgan says
Hi Jess,
Thank you SO MUCH for coming back here and leaving me a comment! I appreciate that so much - I'm very happy you enjoyed this recipe! My e-book has the multigrain version of this bread in it, along with a cinnamon raisin variation. 😉 Hugs!
Dodi Hall says
Can the dough be kneaded by hand? I only have a hand mixer, and yes, it didn't work well, as you warned. Since I can't afford a stand mixer right now, I'm hoping I can knead it with enough oil on my hands so the dough won't stick. Thanks!
Mēgan says
Hi Dodi, that's a good question. I've never attempted it before, so I'm not sure, but think it would do okay? If you were to try it, start with the ingredients/dough in a bowl and stir with a wooden spoon until you can't anymore. Then turn the dough out onto an oiled surface and knead. Knead for a good while, until the dough is smooth and will hold its shape. Good luck! I hope it works well for you!
Dodi Hall says
That gave me hope! I will certainly try your suggestion and let you know how well it comes out. Thank you so much!
Mēgan says
Absolutely! I hope it works well for you! Fingers crossed. 🙂
Olena Harasymowycz says
Hi! id it work with kneading?
Philly says
Hey ? can loaf/bread pan work ?
Mēgan says
My guess is no, but I haven't tried it personally with this specific recipe to know for sure. Because this recipe uses psyllium husk powder, it's a heavier loaf of bread. When it rises, it needs to expand from all areas, not just up. I've tried using a bread pan with another recipe (but similar) and it didn't work well - that's why I'm thinking it won't work.
Wendy Williasm says
Hi,
Just wanted to chime in on using a loaf pan. I just made this last night intending to follow the instructions exactly. But, my dough was so wet that I didn't think it would keep a shape at all, so I put it in a 9x5 loaf pan. It didn't rise as much as your other breads (i.e., vegan/oatmeal-millet/rice-free), and I got less "oven spring" from baking. It produced a dense, slightly gummy loaf, even though I baked it to 205 and let it cool for 2 hours before cutting. The loaf was probably 2/3 the height (at most) compared to the height I get from the other 3 recipes baked in the same pan.
HOWEVER, it is a hearty loaf that would be lovely with stews and soups or with pâté. The taste is fine, the crust is lovely, it toasts nicely in a toaster, AND it makes clean, sturdy slices that don't fall apart into a shower of crumbs when trying to butter, toast, cut up into pieces, or use after freezing.
So, my conclusion is that I learned a lot. I probably wouldn't use a loaf pan again, but as several GF bakers have said, "even your failures can be delicious". And I can now understand why you say "it needs to expand from all areas, not just up" and I know a little more about xanthan gum vs psyllium husk powder in GF baking.
Emily Beckett says
I had this same problem, my dough was too wet and didn't form. It's rising now but I don't have alot of hope for it.
Mēgan says
Hi Emily, Did you make any substitutions? And you were using powdered psyllium husk, not whole psyllium husks?
Liz S says
yes, I was successfully able to use a loaf pan with this, and it made a great loaf.
June says
I can't wait to try this 🙂 I did have 2 questions:
1) I don't like sweetness in my breads -- can I omit the sweeteners without and detriment to the structure of the bread?
2) Would a GF sourdough starter work as a substitution in place of the yeast?
Thank you!
Mēgan says
Hi June,
I wouldn't eliminate the maple syrup, because that aids in moisture. You might be able to reduce the cane sugar by 1-2 tablespoons, but I can't tell you for sure how that will affect the bread, because I've never tried it myself.
Re: sourdough, I've never tried it with this recipe - you might need to experiment!
Karen Waterman says
I’ve made this bread once and love the texture and flavor. I just mixed up a 2nd batch, which is rising as I peck. Having a bit of an issue with the liquid to flour ratio. 1st time it was so wet and loose I ended up adding about another cup of flour. This time I tried cutting the liquid and it was too stiff so I added back in the liquid I’d reduced out plus more. It’s still pretty stiff — stiffer than what I can deduce from your pics but close. I’m wondering in this case if it’s the ground chia. I measured out 1 Tbs and ground it then put in that whole amount, which was more than one Tbs. once ground. I am also substituting freshly ground (by me) oat flour for the sorghum. Should the chia be 1 tbs AFTER it’s ground. Don’t think the flour sub is an issue since I did that the first time too. Anyway, love the bread and I’m curious to see how this stiffer loaf turns out.
Mēgan says
Hi Karen,
I'm so glad you enjoy this recipe! Different flours have different moisture levels. Some are very dry and require more liquid, while others are more moist, and require less liquid. So when you make a flour substitute in a recipe, you have to compensate for or decrease the amount of liquid used. I go through this every time I create a new recipe. It's all an experiment to get the ratios just right!
You want to grind the chia seeds first, and then measure out the 1 tablespoon (I grind 1/4-1/3 cup at a time and store it in a canning jar in the freezer). I'd imagine that the extra chia, combined with the flour sub is why your liquid ratios are off. Although, weather and humidity can also mess with moisture levels in baking.
When I first started blogging, this is what I was told about recipe writing (this might come in handy for other recipes you see?):
If you see 1 cup ground buckwheat flour: This means you grind the whole buckwheat into flour first, and then measure.
If you see 1 cup buckwheat, ground: This means you measure out the buckwheat first, and then grind.
I hope that helps!
Karen Waterman says
Yes. Rule of thumb about 1 c ground flour vs 1 cup flour ground makes sense. I have never been sure if there is a consistent convention. Now I see that logic has, in fact, prevailed. Excellent! As for the flour, I don’t think that’s the variable as I used the same sub the first time. In thinking about it while the bread’s been baking I’m wondering about the psyllium. I purchased new “ground” psyllium in between these two loaves and this new psyllium is quite powdery. Maybe I just thought it was ground psyllium the first time but it wasn’t. I expected it to be very “husky” if it was unground.but having little to no experience with psyllium I may have misread that one. Anyway, curious to know what you think about the psyllium. I really appreciate your response. Love the recipe and I will (most likely with your help) figure out my variables. I will never make another bread with xanthum after this. SOOOO much better with psyllium!
Mēgan says
Hmm... do you want to send me a picture of the consistency of your psyllium husk powder (allergyfreealaska at gmail.com)? Then I can compare it to my own?
Ann says
Wow,your recipe is almost the same as mine that I have been using for many years.The only difference is the measurements and the millet flour that it is not in my recipe (I use blanched almond flour,sorghum,brown rice and arrowroot instead of tapioca due to autoimmune diseases).Other then that,everything is the same.It does taste wonderful. I was told by my friends, whom I shared my recipe with,that it taste like whole wheat bread made in those outside clay ovens.
Mēgan says
Hi Ann, great minds think alike! 🙂 I also have a multigrain variation of this recipe that uses almond flour, too. It's available in my e-book, Gluten-Free Baking From Scratch.
Alene says
I made this yesterday and made a peanut butter and jelly sandwich today! Yum! It's a simple bread to make and it tasted good. Mine had risen when I proofed it, but it didn't stay up after I took it out of the oven. So my pieces are sort of narrow. What might I have done to make that happen? It's still good though, and I will make it again, for sure! Thank you for a tasty recipe!
Mēgan says
Hi Alene,
I'm so happy you've been enjoying this recipe! Try reducing the water used by 2 tablespoons. It could be that with your heat/humidity, you just don't need quite as much liquid. 😉
Ann says
Hi Megan, I attempted the bread tonight but it came out flat. The dough didn't really hold its shape and spreaded out like a disc on the baking sheet. Do you know why this would happen? Thanks very much.
Mēgan says
Hi Ann, my guess is that it has something to do with the psyllium husk. Are you using the powdered variation? Or did you use the whole husks?
Alyssa Johnson says
Hi there, is it possible to use a sourdough starter instead of yeast?
Mēgan says
Hi Alyssa, I have never tried a sourdough starter with this recipe, so I'm not sure.
Jo says
This is a very good bread thank you!! Even the kids enjoyed it (tough critics!) Do you have the measurements in grams rather than cups for the flours? Thinking that might produce a more consistent result 🙂
Mēgan says
Hi Jo! Thank you so much - I'm thrilled you enjoy this recipe! I do not have measurements in grams. I tried to convert a recipe once from cups to grams - it was a hot mess. HA! 😉
Thasami says
This is such an awesome recipe, thank you for sharing! I'm not much of a baker but my bread tastes better everytime.
Mēgan says
Awesome!! You're so welcome!
Wendy W says
Hi Megan, I am having trouble with a few recipes being too salty. I have been researching salt and found that there is a huge variation in salts which would explain my problem. I am almost done with a huge bag of sea salt that is lovely, but is no longer sold by Bob's Red Mill, but I am nervous about buy now as there are some reviewers that complain about sand in sea salt causing grittiness. What brand(s) do you recommend?
Mēgan says
Hi Wendy,
I typically buy the Vitacost brand of Himalayan sea salt. It does have a grittiness to it at times, but it’s never bothered me or had an off-putting effect. The other brand I’ve used is the San Fransisco Salt Co. (you can find it on Amazon). I think it’s a bit higher quality than the Vitacost brand. Hope that helps!
Iana says
Hi Mēgan,
The bread looks amazing and I’d like to try it but I’m from the UK and the cups/spoons measurements confuse me and I’m scared I’m going to end up with cake batter rather than bread 🙂 Is it possible to list the ingredients in grams? Thanks ?
Iana
Mēgan says
Hahaha. I feel the same about grams, Lana! 😉
Kate says
Megan, you are a genius! Thank you so much for this recipe. I've been baking wheat bread for years but this was my first attempt at a GF loaf and I'm thrilled with the results. My family wolfed it down and didn't even realise it wasn't "real" bread 🙂 Just for the record, I replaced the chia with flaxseed and mixed and kneaded the dough by hand (oiled my hands so it didn't stick too much) and let it rise for about 90 minutes. Cooked it for 45 minutes and did the knock test on the bottom - perfect! Thanks again - you have made our transition to a GF diet so much easier.
Mēgan says
Your comment made my day, Kate! I’m so happy to hear it was a hit with everyone - wonderful!
Suzi says
I loved mixing and kneading it by hand too! Kneading has always been my favorite part of making bread. I loved how smooth the dough was too. I've made other gf breads and this was the best. Light and nutty. I'm definitely making it again.
Suzann says
This recipe is amazingly easy to put together. Thank you for sharing it! I had to substitute quinoa flour as I'm not supposed to eat millet. Also, I omitted the maple syrup. I ended up with a beautiful, tasty loaf of bread. Thank you!
Mēgan says
Very happy to hear that, Suzann! 🙂 You’re welcome!
Moni says
I just received the last ingredient for this recipe and I’m nervous about the rise. Can you give tips on how to have a successful rise?
Mēgan says
Hi Moni,
That’s a great question! My advice is to not overthink it. Use the SAF brand of yeast and make sure your water is the right temperature. Don’t put your loaf in a heated or warm space, because it could cause it to over proof. Do cover the raw dough with a clean kitchen towel. When you use the right ingredients, it’s pretty fool proof. 😉 You’ll have to let me know your results! I hope you love this bread!
Lori B says
Hello!
I recently found your site and this recipe and am excited to make this whole grain bread. But what would be a good substitute for the millet flour? Quinoa four? More brown rice flour or sorghum? I'd like to not make a brick because the photos look so yummy and I'd love a good sandwich! Thank you for all your tips and work on the recipes here!
Mēgan says
Hi Lori,
I would try more brown rice flour and more sorghum flour. 🙂
Melissa says
This came out great! I modified the recipe based on what I had. I had tapioca flour, but none of the other flours, so I substituted fine white corn flour for those (not corn starch, just the corn flour I get at an Indian grocery that’s more finely ground than the usual American cornmeal). The psyllium husk made it seem very much like a gluten bread, and it had a great crunchy crust.
My family ate it fast and asked for more. I’ll do a bigger batch tomorrow. (I have a Bosch Universal Plus mixer, so I regularly do quadruple batches of things.)
Mēgan says
Wonderful! So happy it turned out well for you, Melissa!
Cora Whitmoyer says
I love this recipe and this is my second time making it. Both times though the shape does not turn out. It ends up rising out (so when bread is sliced I have long (not tall pieces)). Do you have any tips to get the bread to rise up?
Mēgan says
Hi Cora,
I would reduce the amount of water used in the recipe by 2 tablespoons, and see if that helps. That will give you a thicker dough that should rise up instead of out.
Mooky says
Seems odd to me not to bloom the yeast as I always bloom my yeast when baking normal breads. I am just getting into gluten free and vegan cooking, is it normal to not bloom your yeast for gluten free and vegan bread recipes?
Mēgan says
Hi Mooky, Active Dry Yeast requires proofing (with sugar and water) prior to being added to the dough. Instant yeast does not require proofing. You add instant yeast straight into the dry ingredients, where it will dissolve in the dough when baked. So it has nothing to do with gluten-free or vegan baking - it's just a different type of yeast. 🙂
Vicky says
I tried to make this and my dough ended up like soup. I only put in 2 cups of water but I think one cup would have been more like it. The recipe says only four cups of the flour mix and 2 1/4 cups of water. Can this possibly be right?
Mēgan says
Hi Vicky,
Yes, that water measurement is correct, so I'm assuming something with your psyllium husk powder might be off. Did you used the powdered variation of psyllium husk? Not the whole husks?
Naomi says
Have you tried this in a bread maker dough cycle?
Mēgan says
Hi Naomi, I have not. I don't use a bread maker, so I'm afraid I don't have experience using one.
Alexis Hillyard says
Hi Mēgan!!! Love your work. Can I mix this by hand? I don’t have a stand mixer.
Mēgan says
Hi Alexis, thank you! I suppose you could mix it by hand, but just thinking of it makes me arms hurt. Ha. ? Although I have autoimmune arthritis too. If you do try mixing it by hand, please come back and let me know what your results were!
Carol Ann Rickard says
I tried this recipe this morning. It tastes great!! Although I measured everything exactly and followed your directions my end product dough was not as stiff as it should have been which I didn't pick up on. Consequently the dough spread out instead of up during the rise stage. It was about 204 degrees when I removed it from the oven after 40 min. A bit gummy and only 1 1/2" tall at most. I proofed my yeast and it was perfect! I'd like to try again. Should I cut back on the water and add bits at the end to bring the dough to the desired consistency? My chia seed and psyllium husk are both ground fine.
I look forward to trying some of your other recipes after I get this one figured out!
Thanks!
Mēgan says
Hi Carol Ann,
Are you using the SAF instant yeast? Because if so, that does not need to be proofed ahead of time. If your dough is too runny, you can decrease the water by 2 tablespoons. That should help!
Vb says
Hi was wondering if I could mix sourdough starter along with less yeast
Also I have a rooster pan can I make the same in this pan.
Can I use finger millet flour in lieu of yellow millet flour
Thankyou for reading my post
Mēgan says
Hi there,
I've never tried a sourdough starter in this recipe, so I can't give you an answer to that question. You might just need to experiment. Just keep in mind - sourdough is not gluten-free, unless it's a sourdough specifically started and fed from gluten-free flours.
As for finger millet flour - I actually had never heard of that specific type of millet? I had to do a Google search. I would think it would act very similarly to the yellow millet flour, but can't say for sure since I haven't used it before? You might just need to try it and see how it goes.
Helen Srour says
Hi
I've been trying your bread a number of times with disappointing results. It's not that we can't eat it but it's a very heavy crumb. I've tried adding less water but still the same. In the proving process it rises for the first 20 minutes then stops 😖 I really love the idea of using all the ingredients for a high fibre loaf but I'm feeling very discouraged. Any tips please 😐
Mēgan says
Hi Helen,
Are you changing anything in the recipe? What kind of yeast are you using? Do you live at a high altitude? You're always welcome to email me to help troubleshoot, too - allergyfreealaska (at) gmail.com.
Dawn Dunsmoor says
Thank you So much for this recipe. My family doesn't even know it's GF bread, just Grama's good bread. Recipe is really consistent. A great loaf every time, even when I mess up. I use the same measure for the psyllium as I do for the additional water. Goofed one day w/o my glasses and made a loaf with 2 1/3 c water and 1/3 c psyllium and the result was just as good. Same great taste and chewy bread yumminess. But, the bread is easier to cut. No more gummy knife. This, like your cinnamon rolls are a hit with the whole family. Thank you!
Mēgan says
Awe - thanks for leaving me a comment, Dawn, to let me know that! I appreciate it and it makes me so happy to hear!
JB says
- 1 cup tapioca starch (90 g)
- 1 cup millet flour (108 g)
- 1 cup brown rice flour (120 g)
- 1 cup sorghum flour (128 g)
- 1/4 cup powdered psyllium husk (32g)
These gram measurements are from the Nutrition Facts labels on the bags of flour. For example, Arrowhead Mills Brown rice flour says the serving size is 1/4 cup (=30 g). So a cup is 30 x 4 = 120 g.
I’ve used these measurements and bread was perfect — except the bottom burns, using the cookie sheet method. Do you have any idea how to fix that? Thanks!!!
Mēgan says
Hi JB,
Thank you for sharing those measurements and your experience with them!
As for the bread burning on the cookie sheet, I have a few thoughts. I've found this is more apt to happen when using a non-stick cookie sheet. Whatever the layer of non-stick is, it heats a little hotter than just the plain aluminum baking sheets. Otherwise, if you don't suspect the cookie sheet, I'd try lowering your oven temp. I'd start with 375 degrees (F), you just might have to bake it a little longer. Also, it could be your oven runs hotter than what it should. You might think about getting an oven thermometer to see if your oven needs recalibrating. Hope that helps!
Debbie Feely says
The weights are interesting. I looked up oat flour since that’s not mentioned and found a list of weights per measure from Bob’s Red Mill that was significantly different. Perhaps the secret to my many bread fails is just this. Brands do matter. Who knew! I will use this info as I try the recipe.
Diane Wenzel says
Thanks for the terrific artisan gluten free bread recipe Megan. Since my toddler granddaughter has recently been identified as having a whole range of food allergies, I have been on the hunt for gluten free, pretty much everything free (it feels like) recipes. She loves this bread and I just made another loaf on mom's request because she says its so much better than anything store bought she's found. The texture and flavour is lovely, and cuts well. My only wish is that it were higher. I am thinking it may be connected to how I shape the dough. Can you tell me the length and height the formed round/oblong dough should be? Also you mentioned not using a warm rising environment. Should I not be using my oven's proofing setting? My granddaughter can't have rice so I sub out with more of the other flours, and a portion of tiger nut flour (one of my favourite gluten free flours). I also got a browner crust this time round by brushing the dough lightly first with aquafaba, and then dairy free milk. Thanks for all the great recipes you provide to gluten free bakers like myself.
Mēgan says
Hi Diane,
I'm so touched by your comment. Thank you for coming back here and letting me know this artisan gluten-free bread recipe works for your granddaughter!
It's actually been a while since I have made this bread - I was very ill and am on a strict grain-free/sugar-free diet. If I recall, I think my bread was 2.5-3" high when I formed it into a ball? That said, I have another idea for you. With the flour swaps you made, I'm thinking the amount of water called for in the recipe may be too much (different flours have different moisture needs). Causing the bread to spread out vs. bake upwards. Next time you make it, you might trying to reduce the water by 2 tablespoons and see if that makes a difference. Hope that helps!
diane wenzel says
Thanks so much for your prompt response Megan. I am so sorry to hear you have been ill and hope dietary changes are helping you to feel better. I know how much work goes into baking with restrictions but you show it can be done! I will try the less water tip and ensure the dough ball is 3 inches high next time. Regardless my granddaughter loved it, particularly smeared with macadamia nut butter and a bit of honey.
Mēgan says
Thank you for the well wishes, Diane! I appreciate that! I hope the less water helps. You'll have to keep me posted!
Brenda Teshka says
Hi Megan,
I have made this bread twice now. The second loaf is in the oven now. We love the texture and taste. However, the dough is much wetter than your picture. It spreads out a lot. It is probably 2-1/2 inches high. I have filled the directions to the t. What am I doing wrong? I am taking this to a dinner party. I feel bad it in not a good height. But, they will love the taste.
P.S. I have been cooking gluten free for 16 years now.
Mēgan says
Hi Brenda,
I'm so happy to hear you enjoy this recipe! I honestly don't think you're doing anything wrong. Sometimes bread recipes behave differently between the humidity and flour/starches. I have a simple fix, though! Try reducing the water used by 2-4 tablespoons. That will create a stiffer dough that will rise up instead of out.
Jordan says
Hi there! Do you know if a liquid sweetener, like agave nectar or something similar, could replace the cane sugar?
Mēgan says
Hi Jordan. If you add a new liquid (like a liquid sweetener), you'd have to reduce the water so the dough isn't too runny. And a liquid sweetener will be thicker than water. So for every tablespoon of liquid sweetener added, I would reduce the water by maybe 3/4 tablespoon. But this is entirely a guess, you'll need to experiment.
Betty Hedstrand says
I made this at a vacation rental without all my home baking tools. I was only missing the honey. The bread turned out very well. My gluten-eating family members asked for seconds! I am newly gluten free and this is the second artisan bread recipe I’ve tried. This is definitely a keeper! Thank you for sharing the recipe. I hope you publish a bread cookbook with your gf recipes.
Mēgan says
Hi Betty!
I'm so happy you enjoyed this recipe! I actually have an ebook that's all about gluten-free baking: Gluten-Free Baking From Scratch.
Cheryl says
Do you leave the loaf on the parchment paper when baking?
Mēgan says
Yes!