
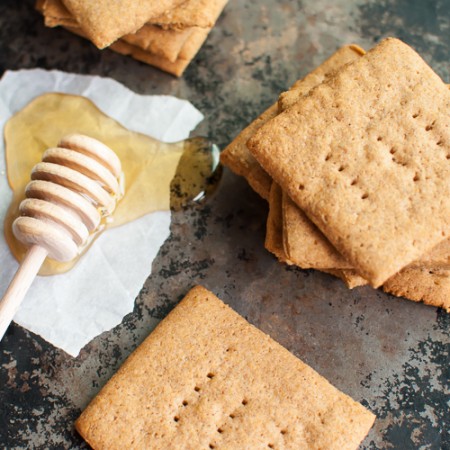
Fall is one of my favorite times of year, and pumpkin-spiced treats like these Gluten Free Pumpkin Scones are just one small reason why. These gluten-free scones are perfect paired with a cup of tea or coffee, and are so flavorful and delicious, you'll want to keep a batch on hand all the time!

The first time I made these gluten-free scones, I made a double batch of them for our church's Easter Sunday brunch. They were gobbled up quickly and well loved by everyone, so I just knew I needed to share the recipe on my blog!
These gluten-free pumpkin scones are soft and tender, yet a bit crumbly - just like a scone should be. But, what really takes these delicious scones over the edge is the icing. It is lusciously sweet and spiked with just a touch of cardamom, which compliments the pumpkin exceptionally well.
Cardamom is a very strong spice, which means you only need to use a small amount of it. So make sure when you make the icing, use a very small pinch. You can always add in more.
I also use cardamom to spice the glaze in my gluten-free pumpkin bread. It's heavenly!
I love gluten-free pumpkin recipes - gluten-free pumpkin pie is my favorite, with gluten-free pumpkin cookies coming in a close second.

How to Shape Gluten-Free Scones
Normally when making scones, you roll out the scone dough and then cut it into triangle shapes. This dough is too wet, which is why I use a trigger release scooper to form the gluten-free drop scones.
You can buy a trigger release scooper at most grocery stores or kitchen stores. They come in a variety of sizes - from a few teaspoons, to a few tablespoons. I use mine all the time for shaping/scooping cookie dough, portioning out muffin/cupcake batter, and for forming gluten-free drop biscuits and scones.
The best part of using a trigger release scooper to form the gluten-free pumpkin scones?! Waaaayyyy less mess!
I also love the look of these soft keto pumpkin cookies if you're looking for a sugar-free, grain-free variation.


You don't have to use a scooper, but I definitely would recommend it so all of the scones are the same size. The scooper I own has a trigger release, so there's no fighting with the dough to remove it from the scooper.
I also use a trigger release scooper to form gluten-free biscuits.

Speaking of sweet treats I'd love to have with a cup of coffee, check out these delish Gluten-Free Pumpkin Donuts from my sweet friend, Chrystal, of Gluten-Free Palate.

How to make gluten-free pumpkin scones:
- Preheat oven to 425 degrees (F).
- In a large mixing bowl, whisk together the dry ingredients. Cut in the shortening until mixture resembles coarse crumbs.
- In a small mixing bowl, whisk together pumpkin, almond milk, vanilla, and egg. Pour the wet mixture into the dry and mix until just combined.
- Using an ice cream scooper, scoop the dough into balls (about the size of a golf ball) and place onto a parchment paper or silicone lined baking sheet. Wet your fingers and carefully pat down the tops of the dough balls until the dough is ¾ to 1-inch thick.
- Bake for 11 - 13 minutes. The scones will not be visibly brown when finished baking; however, the bottom of the scones should be light golden brown when done. Do not over bake.
- Allow to cool completely on cooling racks before icing.

I hope you enjoy these gf pumpkin scones as much as me and my family does!
xoxo,
Mēgan
Gluten-Free Pumpkin Scones Recipe:

Gluten-Free Pumpkin Scones
Fall is one of my favorite times of year, and pumpkin-spiced treats like these Gluten Free Pumpkin Scones are just one small reason why.
Ingredients
For the scones:
- 1 cup sorghum flour
- ½ cup millet flour or brown rice flour
- ½ cup tapioca flour
- ⅓ cup coconut sugar
- 1 tablespoon baking powder
- ¾ teaspoon xanthan gum
- ¾ teaspoon cinnamon
- ½ teaspoon nutmeg
- ½ teaspoon ginger
- ½ teaspoon ground cloves
- ½ teaspoon sea salt
- ½ cup palm shortening
- ½ cup unsweetened pumpkin puree
- 3-4 tablespoons almond milk
- 2 teaspoons vanilla extract
- 1 large egg
For the Icing:
- ¾ cup organic powdered sugar
- 3-5 teaspoons almond milk
- Pinch of cardamom (a very small pinch… a little goes a long way)
Instructions
To make the scones:
- Preheat oven to 425 degrees (F).
- In a large mixing bowl, whisk together the dry ingredients. Cut in the shortening until mixture resembles coarse crumbs.
- In a small mixing bowl, whisk together pumpkin, almond milk, vanilla, and egg. Pour the wet mixture into the dry and mix until just combined.
- Using an ice cream scooper, scoop the dough into balls (about the size of a golf ball) and place onto a parchment paper or silicone lined baking sheet. Wet your fingers and carefully pat down the tops of the dough balls until the dough is ¾ to 1-inch thick.
- Bake for 11 – 13 minutes. The scones will not be visibly brown when finished baking; however, the bottom of the scones should be light golden brown when done. Do not over bake.
- Allow to cool completely on cooling racks before icing.
To make the icing:
- Whisk together ingredients until smooth and add almond milk until icing reaches desired consistency.
- Drizzle on cooled scones, or dunk the scones upside down into the bowl of icing. Let the excess icing drip into the bowl before setting the scone aside for the icing to dry.
Recommended Products
We are a participant in the Amazon Services LLC Associates Program, an affiliate advertising program designed to provide a means for us to earn fees by linking to Amazon.com and affiliated sites.
-
 MADHAVA Organic Coconut Sugar
 -
 Pure Vanilla Extract, Certified Organic
 -
 Wholesome Sweeteners, Inc., Organic Powdered Confectioners Sugar, 16 oz (454 g) - 2pcs
 -
 Spectrum Naturals Organic Shortening, All Vegetable, 24 oz
 -
 Reynolds Kitchens Non-Stick Parchment Paper - 60 Square Feet
 -
 Libby's Pure Organic Pumpkin, 15 Ounce (Pack of 12)


Jenn says
Megan this looks excellent! I am curious though, having never used palm shortening, are there any substitutes for it? Would coconut oil be suitable?
Megan says
Hi Jenn,
Palm shortening is the consistency of Crisco (yet much healthier). It's thicker than coconut oil and holds the shape/consistency of baked goods (specifically those of the scone and biscuit variety) better than coconut oil does. That said, coconut oil might work, but the scones might be flatter than what you see in my pictures. If you do try making the scones using room temp coconut oil, would you please come back and let us know how they turned out?
Hugs,
Megan
Kirsten C. says
These sound fantastic! Do you know if I can substitute the sorghum flour for another GF variety? Have all the other ingredients on hand so am trying to avoid a trip to the grocery store 🙂
Megan says
Hi Kirsten,
You could probably use 1 cup brown rice flour, 1/2 cup millet, and 1/2 cup tapioca starch.
🙂 Hugs,
Megan
Erin says
Thoughts on substituting regular baking powder with Ener G baking powder (corn-free), ground flax mixed with water for the egg, and coconut milk for almond milk? Also, what would you suggest to substitute the xanthan gum with? Unfortunately, I need to avoid dairy, egg, wheat, soy, corn, gluten...due to allergies.
Megan says
Hi Erin,
The Ener G baking powder will be fine, so will the coconut milk. If you can't use xanthan gum, try guar gum. I think the flax egg should be okay, but I haven't tried it myself, so I can't tell you for sure. Good luck!
Hugs,
Megan
Erin says
Thank you so much! I can't wait to try them!
April says
It sounds like you and I have similar allergies! What are some of your favorite go to sites if you don't mind my asking?
Shirley @ gfe & All Gluten-Free Desserts says
Oh, Megan, these look fabulous! I love that last photo! You know I'm a pumpkin lover and I hate it when pumpkin recipes only appear in the fall (usually only October), so I am thrilled to see these delectable scones of yours! 🙂 I'm thinking these will need to be shared on All Gluten-Free Desserts ... All the Time soon!
Happy weekend! xo,
Shirley
Suzanne Perazzini says
These look pretty and healthy. I have tried all thse flours but millet and like to work with a combination of them as well to get the best texture.
Adrienne @ Whole New Mom says
These look wonderful! Thanks for a great recipe!
Kate @ Eat, Recycle, Repeat says
These look great! I love cardamom as a secret baking weapon - my Swedish great-grandmother left me with that little gem.
Jacqueline @ Deeprootsathome.com says
I really NEED to get up and running with gluten-free baking! you've got me thinking, anyway!
Also, as we follow along with Jesus'last week before going to His Father, I am so thankful we don't get what we deserve! It is all for His namesake and ultimate glory! Oh, what a wonderful Savior we have! May you have a blessed Resurrection celebration with your loved ones!
Jacqueline
Danielle @ Poor and Gluten Free says
These look wonderful! Happy Easter and thanks so much for sharing this on WNWNW, I’ve pinned it 🙂
Lea H @ Nourishing Treasures says
Thank you for your submission on Nourishing Treasures' Make Your Own! Monday link-up.
Check back tomorrow when the new link-up is running to see if you were one of the top 3 featured posts! 🙂
amber says
Hi Meg,
Oh goody!! I have all these ingredients. I can't wait to make these. I'm just starting the journey of teaching myself how to really bake gluten free and these will be a great recipe to practice. You're so clever, Meg!!!
Megan says
Amber,
Practice? You hardly need any, my dear! I think you're an expert already! 😉
xo,
M
Patty says
I made these with room temp coconut oil and reduced it to 1/3 cup. They turned out awesome! They did taste a bit salty, did you mean 1tbsp baking soda or 1 tsp?
Megan says
Glad you enjoyed them, Patty! I call for 1 tablespoon of baking powder in the recipe - no baking soda.
Susan says
Hi there ..heard lots about you..I'm The Baking Beauties mom. I sent some pumpkins home with her yesterday. Sure hope she bakes up a batch of these and shares with me 🙂
Megan says
Hi Susan,
So nice to "meet" you virtually! I've heard a lot about you, too! 🙂 Very happy to have met your daughter. I've really enjoyed getting to know her. I hope she bakes you a batch of these too!
🙂 Megan
Sarah B says
I'm so glad to have found you! Your recipes look amazing! My daughter and I are gluten free due to sensitivities and I'm mostly dairy free as well. We're not paleo, but drifting that way...we won't cut out any food groups that don't bother us, though. 😉
I've never used palm sugar. Can I use sucanat instead? I have some I need to use before I buy anymore sugar. 😉
Thanks again for all the recipes - I need to get cooking. 🙂
Megan says
Hi Sarah,
Thank you so much for the compliment! 😉 I've definitely drifted more Paleo over the years too, but like you, I won't remove food groups that don't bother me (like beans).
Anywhere you see palm sugar, you can definitely replace it with sucant using a 1:1 ratio. I just prefer palm sugar because I don't think it effects blood sugar levels as much as sucant.
😉 So happy you found me!
Megan
Jennifer says
Call me traditional, but I'm used to seeing scones in a triangle shape. Do you think they would bake up the same with a little pointy end if I cut them in triangles to bake them instead?
Megan says
Hi Jennifer,
I'm what I call a "lazy" scone maker, hence the scoop-drops instead of triangles. 😉 If you wanted to do a triangle shape, try to do it without the use of additional flour (otherwise it will get too dry). But yes, I think they would bake up fine as triangles.
Tessa@TessaDomesticDiva says
Hi Megan! We loved these! I had to make mine gum and egg free, so I subbed 1 tablespoon gelatin in to the dry mix and 3 tablespoon dairy free yogurt. We sprinkled with cinnamon sugar on top prior to baking. Really good!
Megan says
Hey Tessa,
I'm so happy you enjoyed them - and thanks so much for including your substitutions! 😉
Megan
Mindi says
I missed the pat down the dough instruction, so my scones were shaped like the scoop. However, they are delicious. I follwed the recipe exactly for the scone, but added a spoonful of pureed pumpkin into the icing. We will definately make these again. Thanks!
Suzanne Sweet says
Hi there,
Wondering if you can use butter in lieu of palm shortening...I don't want to go to the store...Thanks, Suzanne
Mēgan says
Hi Suzanne,
I would think butter would work fine. Thanks!
Heidi says
We loved these! Thanks so much for your recipe! I will be making them again. And yes... they were a bit crumbly and delicate, but the flavor made up for that!
That being said, I made some minor tweaks which might be helpful for your followers. I avoid baking powder, so I always use half the amount and use baking soda instead (it avoids the corn). In this recipe I put in 1.25 tsp B. Soda. (I usually add in 1 TBS Apple cider vinegar when I do that, but forgot today, I think the egg helped). I also use Psyllium husk powder to replace xanthan gum. And used maple syrup instead of coconut sugar (and omitted the liquid milk. Seemed to work well!
Thanks so much!!!
Super yum! ...
Mēgan says
Hi Heidi,
I’m happy to hear you loved them! They probably were crumbly because of your substitutions. Psyllium husk powder is very drying, so you need more liquid/fat to compensate for that. 😉
Angela says
Instead of all the flours can I just use a GF AP flour?
Mēgan says
Hi Angela,
This recipe has only been tested using the flours/starches above. I cannot guarantee your results if you use a GF AP flour.